Inserting a checkbox in Excel is an easy task, the checkbox control is available in the Excel developer tools option. Checkbox and other controls like drop downs can be quite helpful while designing forms in Excel.
These controls prevent users from entering some unwanted data in your forms and hence they are preferred to traditional textboxes.
Today in this post, I will be guiding you on how to insert a checkbox in Excel. After that we will also see an example of how checkboxes can ease the data analysis tasks.
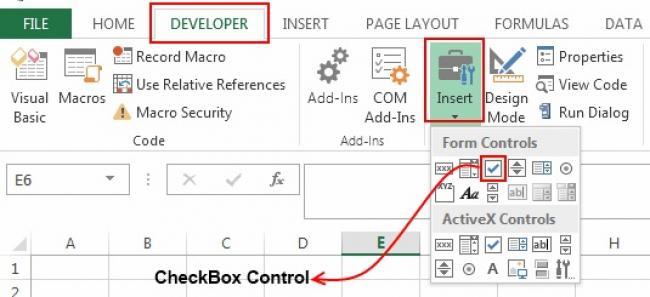
As I have foretold that checkbox control is present in the Excel developer tools. But this developer tools option is absent in the Excel ribbon by default. So first of all, we need to make this option available in the Excel top ribbon and after that we can use the checkbox control. Below is a step by step procedure for adding a checkbox to Excel:
![]()


Fiber Internet: The Gold Standard of Connectivity Jan 22, 2025

The Power of a Smile: Why Smiling is Important. Feb 04, 2025

How do you perform a reset on an LG TV? Oct 29, 2016

Recovery partition is there but recovery won Apr 30, 2016

The History and Legacy of Film Cameras Jan 27, 2025

13.59.222.100 :: Total visit:
| 1 | - - | 43.44.222.400 |
| 2 | -  - - | 67.668.66.30 |
| 3 | - - | 66.149.64.119 |
| 4 | - - | 45.528.44.545 |
| 5 | - - | 37.328.56.60 |
| 6 | - - | 44.249.44.430 |
| 7 | - - | 884.889.830.888 |
| 8 | -  - - | 54.46.448.244 |
| 9 | - - | 17.128.16.232 |
| 10 | - - | 47.328.93.94 |
| 11 | -  - - | 118.110.201.229 |
| 12 | - - | 2a03:2220:f200:25:: |
| 13 | - - | 47.228.226.220 |
| 14 | - - | 2a03:2880:f800:8:: |
| 15 | - - | 2a03:2220:f200:2c:: |
| 16 | - - | 11.128.51.11 |
| 17 | - - | 554.559.543.55 |
| 18 | - - | 97.928.69.86 |
| 19 | - - | 47.118.30.119 |
| 20 | - - | 47.929.44.29 |
| 21 | - - | 2a03:2880:f800:8:: |
| 22 | - - | 2a03:2880:27ff:3:: |
| 23 | - - | 47.448.440.34 |
| 24 | - - | 41.128.109.65 |
| 25 | - - | 47.228.226.26 |
| 26 | - - | 554.559.529.74 |
| 27 | - - | 43.328.334.334 |
| 28 | - - | 97.998.99.87 |
| 29 | - - | 47.128.36.177 |
| 30 | - - | 2a03:2880:f800:3d:: |
| 31 | - - | 66.249.64.939 |
| 32 | - - | 47.228.99.294 |
| 33 | - - | 000.009.030.007 |
| 34 | - - | 47.828.55.888 |
| 35 | - - | 97.928.909.39 |
| 36 | - - | 9a03:9880:f800:9b:: |
| 37 | - - | 2a03:2880:f800:b:: |
| 38 | - - | 54.36.449.75 |
| 39 | - - | 2a03:2880:f800:2:: |
| 40 | - - | 2a11:2881:f811:11:: |
| 41 | - - | 66.949.76.76 |
| 42 | - - | 07.028.020.070 |
| 43 | - - | 114.119.131.35 |
| 44 | - - | 44.428.94.445 |
| 45 | - - | 87.828.39.866 |
| 46 | - - | 2a03:2330:f300:37:: |
| 47 | - - | 47.998.30.6 |
| 48 | - - | 03.59.026.25 |
| 49 | - - | 2a03:2880:f800:f:: |
| 50 | - - | 774.779.736.77 |
| 51 | - - | 52.667.644.676 |
| 52 | - - | 47.888.887.858 |
| 53 | - - | 52.967.999.223 |
| 54 | - - | 77.728.778.757 |